Know Me ME2016 in Minerva Wildflower Cotton Sateen

Does anyone have a favourite pattern? That they keep sewing over and over again? We go through phases of different patterns depending on the weather, what we are doing for work at the time and our general style “vibe” at the time.  Right now, we can’t get enough of Know Me ME2016! The gathered skirt, pockets, shaped bodice and full sleeves… we just love everything about it

Fabric: Minerva Exclusive Wildflower Fusion Cotton Sateen Fabric

We used the Minerva Exclusive Wildflower Fusion Cotton Sateen Fabric – it is the most wonderful whimsical print! The purples and pinks are the most beautiful hue. This is our fourth version of this pattern (did we mention we love it?!). We have made it in a heavier polished cotton fabric and quilting weight cotton, all of which look good, but none as whimsical as this version! Find out more on the Minerva website here.

Pattern: Know Me ME2016

Know Me 2016 is a design by Beaute’ J’adore. The dress is a fully lined bodice that features a shaped tiers with gathers at the front, a high neckline, bust darts, slant pockets, and an invisible back zipper. The dress pattern includes full sleeves in mid or long-length options and elastic at sleeve hem.  Find this pattern on the Minerva website here.

Three tips we have for making Know Me 2016:

1 – Skirt Gathering: If you follow Tricky.Pockets on Instagram, you might have seen her make a version of Know Me 2016. In her fitting comments, she mentions that there isn’t very much gathering in the bottom tier of the skirt that she had imagined, and we totally agreed! In this version, we added more fabric to the skirt to ensure it was gathered all around the bottom part of the skirt. As the fabric is 142 cm wide, we just made the most of the width of the fabric, which also saves fabric waste.

2 – Lengthed Bodice: The bodice has a shaped bodice, with the centre front being higher than the back bodice. As we are quite tall, we extended the length of the bodice while still keeping the shape so the bodice finished closer to our waistline.

3 – Sleeve head: This pattern has a snazzy gathered sleeve trick – a sleeve head piece! It is a petal-shaped piece cut on the cross and folded in half. Yes, we know it sounds odd, but it is life-changing for gathered sleeve heads! Tip – we have learnt the hard way, with a couple of broken needles, that overlockers do not love going through 5 layers of fabric when 4 of those layers are gathered! Overlock the sleeve seam (which attaches the sleeve to the lined bodice) and the sleeve head piece separately. You can then stitch the sleeve head onto the bodice – we joined the two together using a zip zag stitch for extra security.

Finished Make of ME2016

Photo Credits

Photographer: James Christie Media
Pattern: Know Me ME2016
Fabric:  Minerva Exclusive Wildflower Fusion Cotton Sateen Fabric provided by Minerva

16-6 Sleeveless dress Sister Mag by Two Sewing Sisters

Sister Mag Pattern 16-6 Sleeveless dress

When Sister Mag Patterns approached us about making one of their patterns we were excited to explore their collection.  We were drawn the details of the 16-6 Sleeveless dress with the collar, epaulettes and unique tuck detail through the armhole.  The dress features a pleated skirt that has a playful swing and long zipper in the back.

The pattern comes in at an at home A4 version and print shop A0 size.  We opted for the A0 zero option and made sure to turn off the layers we did not need and just printed our size.  

Fabrication

For the fabrication, Sister Mag recommends virgin wool, cool wool fabrics or a fabric that has a nice slightly heavier drape. 

We ordered a lovely ink blue Cora 8 Wal Corduroy from Fabric Deluxe and ordered a little extra so that we could lengthen the skirt. We love the mod style of the skirt but are looking to make a dress we can wear into the office so a longer skirt was needed this time.

Construction Process

We are very visual when it comes to construction instructions. The instruction booklet features a set of dotpoints so we took photos as we constructed our version of the dress and have shared them below with a combination of their instructions and our own notes.

16-6 Sleeveless dress Sister Mag by Two Sewing Sisters

Alterations

The fit of the pattern was great so the only pattern alternation we made was 1cm lift for a sway back. In fabrication we didn’t use leather instead a lined side panel and continued the lining throughout the bodice.

As we mentioned before, to make it suitable for our office spaces we lengthened the skirt but kept the original line and fullness of the skirt.

Due to the heavy weight of the fabric we inserted an exposed zipper compared to an invisible zipper which would be suitable for a lighter fabric.

Step by Step

Finished Sister Mag 16-6 Sleeveless dress

Sister Mag 16-6 Sleeveless dress Details

Credits

Photographer: James Christie Media
Pattern: 16-6 Sleeveless dress supplied by Sister Mag Patterns
Fabric: Ink blue Cora 8 Wal Corduroy from Fabric Deluxe

Melbourne Frocktails

In July we headed to Melbourne Frocktails!  We have seen this wonderful event for several years but this is the first time we got tickets.  Melbourne Frockails is an annual cocktail party for people who enjoy sewing their own garments so the stakes are high for the dress code.  Obviously, me-made is a must!  

The brief was “Sew your finest outfit, and come to chit-chat to sewing peeps from near and far, over cocktails and canapes.” Th event was hosted at The Bank on Collins Street in the heart of Melbourne. Eliza joined us for the event creating a stunning version of By Hand London’s Anna dress in dark green velvet.

Lauren’s Frocktails Dress

We started this dress in 2019 for an event but didn’t get it finished in time – so it got its first outing for this event. I wanted to create something whimsical with a maroon striped lace I had found a Darn Cheap Fabrics and the vision became creating a “maroon fairy”. I was particularly inspired by Needle and Thread dresses with the light lace in gathered ruffles. I had been collecting some images on our Pinterest Board to bring together the concept.

The Pinterest Board

Once I had picked some elements to focus on I started with the bodice of New Look 6494. I liked the rounded bodice detail and sleeves. To test the design lines I took the line drawing from the pattern, which you can just see a faint line of in the sketch and overlaid the additional ruffles.

I wanted to create a soft neckline so I opened up the neckline line and added some gathering into the pattern piece then I used these stand collar pattern piece back to front and added a ruffle at the top edge.

The skirt was formed with three gathered tiers onto a poplin backing (thank you gathering foot, you lifesaver). I wanted to make sure the backing material was not too heavy and take away from the light characteristics of the lace.

The bodice was constructed with the lace basted on a matching poplin which was then treated as one fabric and bagged out with an interfaced support that included boning.

The finished dress

Erin’s Frocktails Dress

Having created many amazing formal dresses for events across the last few years Erin pulled out a favourite that she originally made for the Women in Law Awards when she was nominated for Law Student of the Year. The pattern is Vogue 9343 and we altered the bust to allow for an overlap of the bodice pieces. It is constructed in a printed taffeta weight fabric that was sourced from Darn Cheap Fabrics.

PHOTOGRAPHY NOTES

Photographer: James Christie
Headpieces: Lauren J Ritchie Millinery
Erin and Lauren’s Dress: Fabric from Darn Cheap Fabrics 
Lauren’s Bodice Pattern: New Look 6494
Erin’s Dress Pattern: Vogue 9343
Eliza’s Dress Pattern: By Hand London Anna
Eliza’s Fabric: Spotlight

MaaiDesign Collaboration

When Maaike from MaaiDesign contacted us to see if we’d like to collaborate on a project, we couldn’t respond fast enough!

MaaiDesigns is located locally in Bright, Victoria, just near where we grew up! Operating online Maaike and her team distribute a beautiful selection of fabrics from beautiful North East Victoria to wherever you are!

Maaike started her business with a goal “I had visions of colour, prints and styles that were unique, fun and a joy to wear” and a mission to offer her customers the ability to make unique garments for themselves and their families. We think she has very much achieved this brief!

Fabric from MaaiDesign

For this project, we selected a Viscose blend from Mind The Maker stocked on the MaaiDesign website – Oda Brush – Viscose Linen Noil.

The fabric, which is made in Turkey, is 150cm wide and made from 80% LENZING™ ECOVERO™ Viscose and 20% Linen.

Due to the fibre content, it is highly recommended to pre-wash the fabric as it has a shrinkage of 2-5%. It is machine washable at 30°C (medium spin) – which is also the temperature we prewashed the fabric!

The print on the fabric is a stunning large-scale brush stroke print on a natural white base.  This fabric drapes beautifully, is slightly textured and is divine to wear. It is slightly heavier than a classic viscose fabric.

This fabric is oeko-tex certified as it is a ECOVERO™ Viscose which is a wonderful bonus for the already fabulous fabric!

Fun fact: “ECOVERO™ Viscose fibers are a sustainably certified viscose fiber. It’s made of pulp from wood that derives only from certified and controlled wood sources. The production of ECOVERO™ Viscose only requires half the water compared to regular viscose production, and the CO2 emissions and use of energy is also halved, compared to conventional viscose production“.

Pattern

We love ‘hacking’ together patterns – it allows you to create unique and individual garments which really suit your style without the need to make your own patterns!

We have always loved hacking together Schultaapparel patterns, for this pattern, we hacked together Ottilia Top pattern for the bodice and Minna Dress pattern for the sleeve.

Since we started doing this, Schultzapparel has now released the Ottilia Dress pattern, which actually is basically a pattern of this hack!

For the sleeves, we used the full-length Minna sleeve piece that has gathering in the head of the sleeve and into the cuff.

Construction of our MaaiDesign Collaboration

As this was a viscose fabric there is movement in the fabric which can become difficult to cut if you are not careful. To begin the cutting process we carefully laid out the fabric, folding it right sides together on a flat surface. From there, our goal was not to move the fabric but pin the pattern pieces on carefully and cut around each piece ensuring that markings on the pattern were captured.

For the bottom of the waist darts in the bodice, we did a small snip, just under 1cm long. The seam allowance of this pattern is 2cm so this small snip is not seen in the finished garment.

A classic mistake we make when sewing a wrap dress is either forgetting to leave a gap in the side seam for the ‘wrap strap’ or putting it on the incorrect side. To avoid these mistakes, we lay out the fabric pieces as if we will sew them together (as shown in the picture) and read the instructions carefully.

To keep this garment light and airy once finished we used a bias finish around the neck edge. With the light-coloured background of the fabric, we used a white bias so that it would not be visible once finished.

In the past we have tried doing a full lining of this Ottilia Top pattern – however, the fabric was heavy, and it meant the wrap bodice didn’t sit well. Our preference is to do the facing or bias now when we make this pattern, but it would depend on the fabric choice!

As the rayon is quite delicate and any hand sewn stitches, no matter how small, would be visible, we decided that by using a matching thread, we would top stitch the bias and hem of the dress.

When it came time to hem the dress, we overclocked around all three sides – as it is a wrap dress we needed to hem the ‘side edges’ of the hem as well.

As we started to press the hem up, we realised it would be a much better finish to the dress if we did a double-rolled hem. That way, if the wind catches the full skirt or the wrap of the skirt shows the underside, it was as pretty as could be!

You don’t need to overlock the edge of the fabric if you are going to double roll the hem, but given we had already done so there is no harm in keeping it there.

The photo shows the first narrow fold of the held (with the overlocked edge) followed by the slightly wider second fold. We then top stitched, however, if you wanted, you could also hand stitch to provide an even cleaner finish.

Sleeve length band

The Minna pattern has a full-length sleeve. The pattern is drafted to have a cuff that the fullness of the sleeve gathers into. To allow for flexibility when wearing the dress we have inserted elastic into the hem of the sleeve instead. To do this we did not cut the cuff piece, instead finished the raw edge with overclocking and folded over the fabric to create a self-casing, leaving a small gap in the stitching we pull the elastic through using a safety pin, joined the elastic into a loop and then closed up the remaining section of the casing. This method is very similar as inserting elastic in the waist of a pair of pyjama pants.

In this fluid moving fabric, the shape of the sleeve allow it to bello and loved the opportunity to sit in the fullness of the gathering. Using the elastic means that it can sit at different positions on the arm.

Finished MaaiDesign Dress

What will be next on our make list from MaaiDesign? We have been eyeing the Wilder Gown Pattern in Atelier Brunette Shadow Night (Modal) or the Zadie Jumpsuit in Rifle Paper Co – Canvas – Poppy Fields – Black . Which fabrics from MaaiDesign are on your make list?

Photography Notes

Photographer: James Christie
Dress Fabric: Mind the Maker, Oda Brush Viscose Linen Noil in Plum & Rosewood available on the Maaidesign Website
Patterns: Schultzapparel Ottilia Top pattern for the bodice and Minna Dress pattern for the sleeve.

Nerida Hansen + Rachelle Holowko

We were so excited when Nerida Hansen approached us to be guest sewing ambassadors to celebrate this new fabric collection in collaboration with Australian designer and artist Rachelle Holowko from Pattern and Design

The fabric prints and colours are so beautiful, it was wonderful to sew these two projects!

The Fabric

For these projects, we used three of the Nerida Hansen and Rachelle Holowko collection fabrics. 

The first fabric was the Bold Gingham by Nerida Hansen, which we used for the culottes. 

The second fabric was the Carina fabric in navy by Rachelle Holowko which we used for the Cuff Sleeve Top. 

The third fabric was the Manifesto fabric in wine by Rachelle Holowko which we used for the jumpsuit.

All of the fabrics were the Tencel Linen. We haven’t sewn with Tencel very much before. It has a wonderful drape and silky feel even though it is a medium-weight fabric. 

Tencel is a natural fibre made from wood pulp, which is blended with a small amount of linen for these fabrics. 

Project 1 – Nerida Hansen Culottes

For this outfit, we really wanted to contrast the pretty floral with a bold contrast fabric for the pants. The ‘Bold Gingham fabric has the perfect scale of print for pants and balances the large floral of the top. We don’t usually pair different prints together – so this was a great project to challenge our style!

This was our first time sewing with Nerida Hansen. The cuffs sleeve top and culottes are both simple but effective designs that allow the fabric to be the feature! The patterns are great staple pieces that would be perfect for new sewists looking to expand these skills or for seasoned sewists looking for classic designs to add to their collection.

In particular, we loved that the culottes pattern has a flat front band even though it has an elastic back.

Note: We sized down in the top as we wanted the top to be more fitted than the finished garment measurement indicated on the pattern.

Project 2 – Nerida Hansen Jumpsuit

We made the Nerida Hansen Jumpsuit Sewing Pattern in the Manifesto in wine fabric by Rachelle Holowko.

The biggest challenge was fitting the jumpsuit into the 2 metres of fabric available! 

Based on the pattern, for fabrics that are 137 cm wide you will need:

  •  for sizes 6012, approximately 3.5 metres; and
  • for sizes 14-20, approximately 3.7 metres. 

We managed to make (a slightly cropped version) in just 2 metres! You may be thinking, how? Well, we’ve included a picture of our creative pattern layout below. 

We also managed to get the dominant pattern down the centre front and be (mostly) pattern matched. 

NOTES

Photographer: James Christie
Jumpsuit Pattern: Nerida Hansen Jumpsuit Sewing Pattern
Top Pattern: Nerdia Hansen Cuff Sleeve Top Sewing Pattern
Culottes Pattern: Nerida Hansen Culottes Sewing Pattern 
Fabric: Nereida Hasen 

Fabric and patterns were provided by Nerida Hansen in exchange for photographs of the finished garments. We received no commission in relation to the fabric or monetary payment for this blog post. 

Obsession Blouse by Chut Charlotte

We were invited by Chut Charlotte to stitch up a version of the Obsession pattern .  This classic style pattern is a feminine button-front shirt.  It has multiple collar options that include Peter Pan, Victorian or Mao collars.  The full-length sleeve has a set-in sleeve head and plaquette detail that goes into the button cuff.  

Obsession Blouse by Chut Charlotte

The shirt can be made in cotton, viscose, crepe, double gauze. We chose a texture blue crepe style fabric.

For fabric that is 140cm wide it needs approximately 2 meters of fabric, 10 buttons and lightweight woven interfacings to support the collar and cuffs.

Our Obsession Blouse

For our version of the blouse, we chose the short Victorian Collar and cuffs with the ruffle to match the other ruffle throughout the style. We have styled it here with black tapered leg pants, brogue shoes and matching blue earrings. This styling played into the masculine style button through style of the top that is contrasted by the soft feminine ruffles.

Details of Chut Charlotte’s Obsession

The ruffles are created by folding a long rectangle with right sides together. The end was closed then turned through. Press from the right side and put a gathering stitch along the raw edge.

The ruffle was then pulled up using the gathering stitch to fit the length of the cuff and sandwiched in between the layers.

A key feature of this top, which caught our eye was the ruffle feature throughout the elements of the top.

The pattern pieces are drafted to have an asymmetrical front with the left side split into two above the bust to include this sweet ruffle feature.

The sleeve has a small amount of gathering into the cuff creating a softness to the finish and compliments the folded ruffle edge near the hand.

With different style collar options available as part of this pattern we chose to use the short ruffle collar.   This style of collar matched the ruffle detail throughout the rest of the top. The short stand of the collar (which is also the Peter Pan version) sat well in this fabric once the light woven interfacing was applied.

PHOTOGRAPHY NOTES

Photographer: James Christie
Model: Lauren Ritchie
Dress Pattern: Obsession by Chut Charlotte

Green Cotton Sateen from Minvera in Butterick 6410 & Vogue 9357

There are two things we love sewing:
(1) Hacking patterns together
(2) Pockets (really big useful pockets)
This dress has both!

Getting to add pockets to garments is one of the greatest things about sewing. On the rare occasion, we walk into a store to buy clothing, we are constantly on the hunt for clothes with pockets. So when you get to make your own clothes, you get the opportunity to put pockets in everything!

Fabric: Woven Stretch Cotton Sateen Fabric Green from Minerva

Those who have been following up for a while will know the cotton sateen fabric is one of our favourite fabrics to sew. Cotton sateen is easy to sew with, comfortable to wear and comes in many colours or patterns. And this fabric was no exception. This fabric is a lighter cotton sateen, with a vibrant green background and delicate floral print. The black theme in the pattern means it was really easy to pair with white or black shoes, but still keeping the over vibe of the fabric colourful and bright! See the fabric on Minerva here

Pattern: Butterick 6410 and Vogue 9357

For this dress, we hacked the skirt and pocket combo onto Butterick 6410. Butterick 6410 have a great collar option and centre seam across the bust. To create a feature of these design lines, we used a bias to highlight the seams. Rather than a standard cotton bias, we used a satin bias which creates a great contrast against the green fabric.

One of our favourite pockets are from the pattern Vogue 9357 – they are big and very useful patch pockets. Patch pockets often remind us of vintage kids clothes, only this pattern turns them into modern corporate pockets. It helps that they are sewN into the side seams, giving the pockets a more modern vibe, it also helps keep them sturdy once you fill the pockets!

Vogue 9357 is also a great skirt pattern with an A-line calf length skirt. It is one of our favourite patterns to make and hack onto other bodice fabrics.

Finished Make

Photo Credits

Photographer: James Christie Media
Pattern:  Vogue 9357 and Butterick 6410
Fabric:  Woven Stretch Cotton Sateen Fabric Green provided by Minerva

Christmas Outfits 2021

We continued the tradition of family Christmas outfits continued this year. We took to the beach in Apollo Bay in our matching Christmas print to celebrate together. We hope you had a safe and happy festive period with your loved ones.

This year we used a red background printed Liberty Cotton to created our festive outfits.

Lauren and Fergus

The pattern of this Summer for us has been the Zadie Jumpsuit and this shorts version was not expectation. Fergus featured in his first Christmas photos and promises he will practice posing in his Christmas bowties for next year.

Robyn and David

For Dad’s shirt, we used McCalls 6044. We have recently changed the men’s shirt pattern we used for Dad, and we are really happy with the change. This pattern has more shape through the body, curved hem and front placket detail.

This year Mum chose the Tunic style pattern Vogue 9022 for her dress and is planning her winter versions now.

James and Erin

James chose his got to collared shirt pattern McCalls 6044. Erin adapted a vintage Style Pattern top into a dress with a tiered skirt.

Photography Notes of Christmas Outfits

Photographer: James Christie

Dress Fabric: Liberty from Birch

Patterns:
James – Simplicity 8427
Erin – Style 3897
Lauren – Paper Theory Zadie Jumpsuit 
Robyn – Vogue 9022 
David – McCalls M6044

Headband: Lauren J Ritchie Millinery

Senna Dress made with vintage equipment

When we helped Schultz Apparel test the Senna Dress we were in a lockdown away from our normal machines so we took on the challenge of stitching the dress in a different way. We would normally use our industrial sewing machine or electric domestic Bernina machine then finish our seams using an overlocker. None of this was an option so we scouted our parent’s house to see what we could find.

Senna Dress

The Senna dress is fitted around the bust and loose at the waist. It features a pleated skirt and tie at the center back and waist.

This is a simple beginner-friendly pattern with no fastening just the self-made ties.

Vintage Singer Sewing Machine

We found our Nan’s old Vintage Singer Sewing Machine which is a 306K Model, it has an electric foot pedal and is still working. This was Nan’s first electric sewing machine which would have been purchased in Echuca around 1956 when our grandparents lived in Gunbower. It has made many dresses for our family as has many machines since but this one is lucky enough to still be with us.

In terms of using the machine, it takes some work to get it moving and sometimes required to hand roll the wheel for the first stitch but once moving it stitched really well. The reserve as expected on a machine of this age is a manual leaver which needed to be moved to the reverse position and then back to the forward stitch length position.

Once we had tested the sewing machine worked our next challenge was deciding how to finish the seams. There were a few options including making bias from old sheets but we chose to go with pinking shears which seem appropriate considering the machine we were also using.

Pinking Shears

Before overlockers were available for the domestic market home sewers had to use alternative methods to finish the inside of their garments. Having said this, an overlocker is not essential to have. If you are just starting sewing it can be a large cost and you should not feel the pressure to purchase one, you can find many other ways to finish your seams including bias, zigzag or pinking shears.

Pinking sheers look like a heavier pair of scissors with a sawtoothed instead of straight blades and cut the fabric to have a zigzag edge. This prevents the woven fabric from fraying with the short diagonal cuts of the zigzag that do not provide any long fibres on the edge to get caught or damage and pull their full length. There are few seams in the Senna Dress

Using the selvedge

As we needed the full width of our cotton fabric for the skirt pieces we were to cut across the width of the fabric and we used the already existing selvedges as the finish for our seams. Cheating? Maybe but also using the resources we had on hand, it is an already finished seam and it did not affect the overall finish of the dress

Double Rolled Hem

For the hem of the dress, we created a wide double rolled hem, pressing the material over 1cm and then 4cm. We were able to have such a deep hem because the overall shape of the skirt piece is rectangular meaning that we could work on the straight grain of the fabric.

Finished Zebra Stripes

The Senna dress is simple garment to construct the instructions provided by Schultz Apparel are clever and could be described as the path of least resistant show by the order the all in one neck facing is finished around the neck and armholes.  Always winning points with us the instuctions include understanding in all the good places.

With no fastenings required is a great pattern for beginner sewers to create yourself an easy to wear Summer number. 

Photography Notes

Photographer: Erin Ritchie
Model: Lauren Ritchie
Dress Pattern: Senna Dress by Schultz Apparel

Other Schultz Apparel patterns we have made include Ottlia Top, Begonia Dress and Minna Dress

Christmas Outfits of 2020

The tradition of family Christmas outfits continued this year. We took to the beach in Apollo Bay in our matching Christmas print to celebrate together. We hope you had a safe and happy festive period with your loved ones.

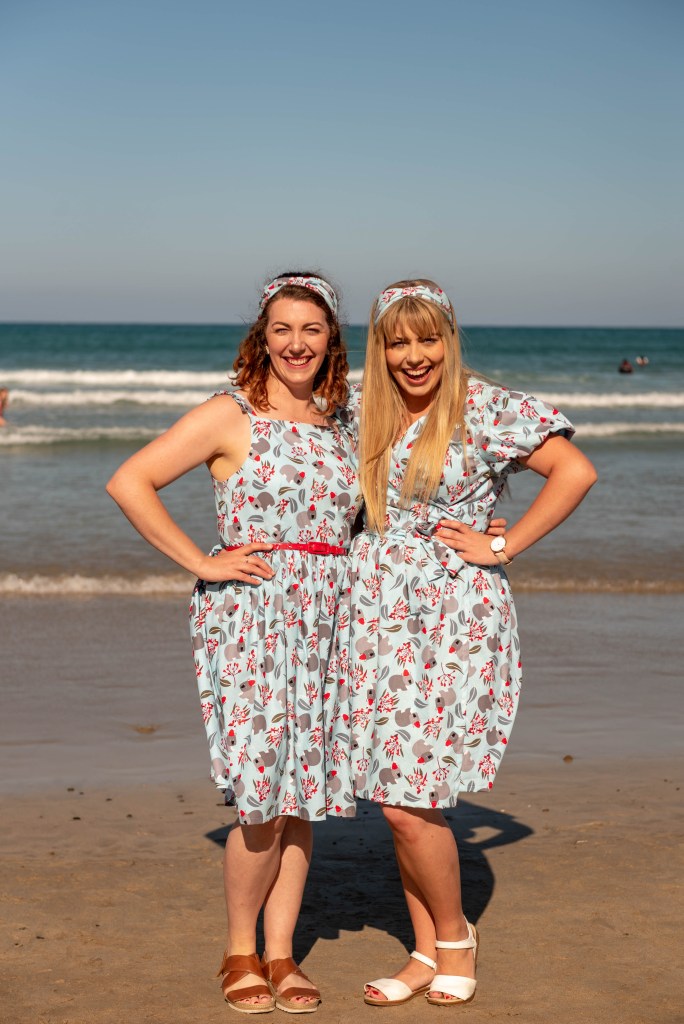
Jocelyn Proust Christmas Wombats

This year we went for a modern Australian print by Jocelyn Proust. The cute Australiana print features grey wombats in red Christmas hats on a pale blue background.

We found the fabric at a Boxing Day sale last year (with luckily enough fabric left on the roll!). The blue background and Australiana print were perfect, as it was different from the traditional red themed fabric from previous years. We didn’t plan what patterns we were going to make when we purchased the fabric but still managed to fit our five garments out of 12.5 metres.

Lauren and Erin

This year we made two of our favourite patterns we discovered in 2020. Lauren was inspired by the ruffled version of the Flora Dress we had made recently and it was a great sleeveless option for a warm Australian Christmas Day. Erin made a dress version of the Schultz Apparel Ottilia Top adding a gathered skirt to the originally waisted top.

Robyn and David

For Dad’s shirt, we used McCalls 6044. We have recently changed the men’s shirt pattern we used for Dad, and we are really happy with the change. This pattern has more shape through the body, curved hem and front placket detail.

Earlier in the year, we made Mum and blue Kingfisher version of Vogue 1511 with the long sleeves. As it is one of her favourite dresses to wear, we decided to use the pattern to make a short sleeve version fit for summer.

James and Erin

James dove into the matching family Christmas outfits and took on the challenge of making his own shirt! This is his third garment having only made 2 pairs of pyjama shorts before tackling his first collared McCalls 6044 shirt.

Photography Notes of Christmas Outfits

Photographer: James Christie
Dress Fabric: Christmas Wombats by Jocelyn Proust
Patterns:
Erin – Schultz Apparel Ottilia Top hacked into a dress
Lauren – By Hand London Flora Dress
Robyn – Vogue 1511
David and James – McCalls 6044
Headbands: Lauren J Ritchie Millinery