Senna Dress made with vintage equipment

When we helped Schultz Apparel test the Senna Dress we were in a lockdown away from our normal machines so we took on the challenge of stitching the dress in a different way. We would normally use our industrial sewing machine or electric domestic Bernina machine then finish our seams using an overlocker. None of this was an option so we scouted our parent’s house to see what we could find.

Senna Dress

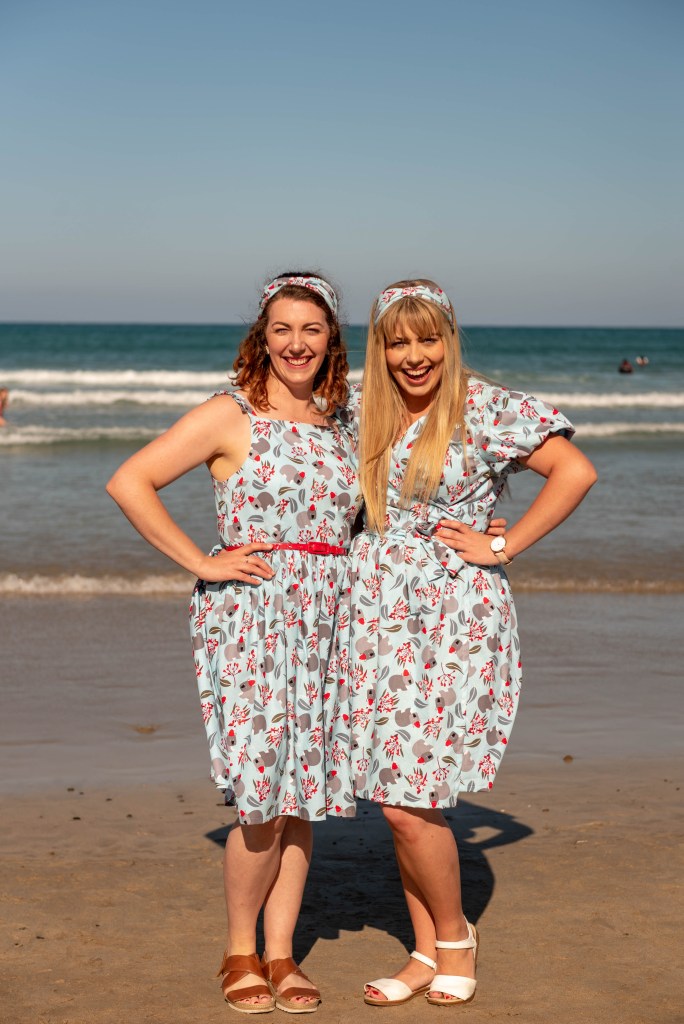
The Senna dress is fitted around the bust and loose at the waist. It features a pleated skirt and tie at the center back and waist.

This is a simple beginner-friendly pattern with no fastening just the self-made ties.

Vintage Singer Sewing Machine

We found our Nan’s old Vintage Singer Sewing Machine which is a 306K Model, it has an electric foot pedal and is still working. This was Nan’s first electric sewing machine which would have been purchased in Echuca around 1956 when our grandparents lived in Gunbower. It has made many dresses for our family as has many machines since but this one is lucky enough to still be with us.

In terms of using the machine, it takes some work to get it moving and sometimes required to hand roll the wheel for the first stitch but once moving it stitched really well. The reserve as expected on a machine of this age is a manual leaver which needed to be moved to the reverse position and then back to the forward stitch length position.

Once we had tested the sewing machine worked our next challenge was deciding how to finish the seams. There were a few options including making bias from old sheets but we chose to go with pinking shears which seem appropriate considering the machine we were also using.

Pinking Shears

Before overlockers were available for the domestic market home sewers had to use alternative methods to finish the inside of their garments. Having said this, an overlocker is not essential to have. If you are just starting sewing it can be a large cost and you should not feel the pressure to purchase one, you can find many other ways to finish your seams including bias, zigzag or pinking shears.

Pinking sheers look like a heavier pair of scissors with a sawtoothed instead of straight blades and cut the fabric to have a zigzag edge. This prevents the woven fabric from fraying with the short diagonal cuts of the zigzag that do not provide any long fibres on the edge to get caught or damage and pull their full length. There are few seams in the Senna Dress

Using the selvedge

As we needed the full width of our cotton fabric for the skirt pieces we were to cut across the width of the fabric and we used the already existing selvedges as the finish for our seams. Cheating? Maybe but also using the resources we had on hand, it is an already finished seam and it did not affect the overall finish of the dress

Double Rolled Hem

For the hem of the dress, we created a wide double rolled hem, pressing the material over 1cm and then 4cm. We were able to have such a deep hem because the overall shape of the skirt piece is rectangular meaning that we could work on the straight grain of the fabric.

Finished Zebra Stripes

The Senna dress is simple garment to construct the instructions provided by Schultz Apparel are clever and could be described as the path of least resistant show by the order the all in one neck facing is finished around the neck and armholes.  Always winning points with us the instuctions include understanding in all the good places.

With no fastenings required is a great pattern for beginner sewers to create yourself an easy to wear Summer number. 

Photography Notes

Photographer: Erin Ritchie
Model: Lauren Ritchie
Dress Pattern: Senna Dress by Schultz Apparel

Other Schultz Apparel patterns we have made include Ottlia Top, Begonia Dress and Minna Dress. 

Styling Little Black Dress for MIMC

The Melbourne International Millinery Competition (MIMC) is hosted by The Essential Hat. This year was the sixth year the competition has run and invited milliners from across the globe to respond to the theme. For 2021 the theme was Little Black Dress. The idea is that everyone will have their own ideas of what Little Black Dress means then design and make a hat to suit it.

Two Sewing Sisters was thrilled to be invited to be part of the team and style the photoshoot for the competition. See all of the entries and photoshoot here.

For us, the Little Black Dress meant something that had diversity and could be styled in different ways. Each milliner was creating a piece to represent what the theme meant for them and we needed looks that could transform to match each hat.

Base Dress

We created a base slip black dress for each model. This would form the foundation, a classic fitted bodice shape to be able to style piece over the top. We selected Gertie Butterick Pattern B6453 as the base and constructed it in black polished cotton for each model.

Chic Jacket

This black lattice lace formed a textured finish to create an iconic Little Black Jacket to be worn over the dress. We used the Pattern Union Felix Jacket with square neck and satin bound collar.

Floral Tribute

Keeping a diverse range of options in front of mind, we wanted to create a very pretty and floral option. We used a vintage Simplicity pattern with ruffle features that allowed us to showcase the fabric’s scalloped edge.

Striking Leather

A strong and striking leather cropped top using Vogue Pattern V1486 created a bold option for a modern aesthetic. The top had raw edges and an exposed open-ended zipper down the centre back.

Starsation

We wanted to make sure we had an option with large sleeves to balance the presence of larger hats or headpieces with a modern fabric choice. We found this star tulle fabric and created a combination of Schultz Apparel patterns using the bodice from the Ottilia Top with a long sleeve from the Minna Dress. We have made these before in striped cotton and strong blue print.

Glitz and Sequin

We could not have a sequin option! We took the cape of Vogue Pattern V 1579 and bound the edge with a satin bias. We have made this pattern before in jacquard and loved the line is created.

With hats and headpieces for all occasions we called on a few pieces from our collection including a vintage top Mum wore to work in the 1980s, a textured knit and tulle overcoat vintage pattern.

Congratulations to Catherine for her work hosting the MIMC competition and The Essential Hat Team. The crew for the photos included
Photographer: Stavros Sakellaris 
Stylist: Two Sewing Sisters
Location: LCI Melbourne
Models: @_simran._ @federicacosino@trulycharliejean
HAMU: TCAamakeup_hmua

Lauren with Catherine Ellen

Christmas Outfits of 2020

The tradition of family Christmas outfits continued this year. We took to the beach in Apollo Bay in our matching Christmas print to celebrate together. We hope you had a safe and happy festive period with your loved ones.

Jocelyn Proust Christmas Wombats

This year we went for a modern Australian print by Jocelyn Proust. The cute Australiana print features grey wombats in red Christmas hats on a pale blue background.

We found the fabric at a Boxing Day sale last year (with luckily enough fabric left on the roll!). The blue background and Australiana print were perfect, as it was different from the traditional red themed fabric from previous years. We didn’t plan what patterns we were going to make when we purchased the fabric but still managed to fit our five garments out of 12.5 metres.

Lauren and Erin

This year we made two of our favourite patterns we discovered in 2020. Lauren was inspired by the ruffled version of the Flora Dress we had made recently and it was a great sleeveless option for a warm Australian Christmas Day. Erin made a dress version of the Schultz Apparel Ottilia Top adding a gathered skirt to the originally waisted top.

Robyn and David

For Dad’s shirt, we used McCalls 6044. We have recently changed the men’s shirt pattern we used for Dad, and we are really happy with the change. This pattern has more shape through the body, curved hem and front placket detail.

Earlier in the year, we made Mum and blue Kingfisher version of Vogue 1511 with the long sleeves. As it is one of her favourite dresses to wear, we decided to use the pattern to make a short sleeve version fit for summer.

James and Erin

James dove into the matching family Christmas outfits and took on the challenge of making his own shirt! This is his third garment having only made 2 pairs of pyjama shorts before tackling his first collared McCalls 6044 shirt.

Photography Notes of Christmas Outfits

Photographer: James Christie
Dress Fabric: Christmas Wombats by Jocelyn Proust
Patterns:
Erin – Schultz Apparel Ottilia Top hacked into a dress
Lauren – By Hand London Flora Dress
Robyn – Vogue 1511
David and James – McCalls 6044
Headbands: Lauren J Ritchie Millinery

Zebra Stripes from Fabric Hoarders - Simplicity 8594 - Two Sewing Sisters

Zebra Stripes from Fabric Hoarders

Fabric Hoarders is an independent fabrics store that is based in Echuca in regional Victoria. Through their online store they have a variety of cotton fabrics and sewing accessories. We first came across Leanne’s business when we were on the hunt for WhipsaWeft interfacing. Whe was the only supplier we could find that had it in stock and we jumped for joy. We were very excited to find her business and even more so when we found out she was from near our home town. We have partnered with Fabric Hoarders to share this project with you with them suppling us with the fabric for this make.

Zebra Stripes Cotton

Previously if you had asked us if we wore animal prints we likely said no. Btut something recently has shifted, Lauren made a leopard print version of Gertie’s Butterick 6556 and then a McCalls 7542.

So when we were looking through the selection available on Fabric Hoarders we stopped to check out the strong pattern of this Zebra Stripe Cotton.

It has a strong contrast between the black and white monochrome pattern and the diagonal line created an interesting effect. The cotton comes in 25cm increments through the Fabric Hoarders website.

Simplicity 8594

We grew up on what are sometimes described as “Big 4” Patterns – this refers to some of the original commercial pattern companies. As part of their A History of series Dressed Podcast have done an episode that explored Paper Patterns that talks about how these were first established. It is interesting to hear about how these companies originated and have evolved into the brands we see today. Take a listen to the episode while you are next sewing.

We have more recently started sewing with smaller often referred to as Indi patterns. Both of these types of patterns are fantastic options and it is worth exploring all different types of patterns to discover different styles and the fit that works best for you.

For this make we used Simplicity 8594, which we have made before, see here. The pattern has two bodice options a crewneck with slit or halter style. The skirt can be made in straight or flared and has pockets in the side seam.

For this version we made the halter style with flared skrit which we lengthened slightly. See Erin cutting the skirt pieces in the video.

Construction

We fully lined the dress, as you might have heard us talk about before we prefer to line our dresses. It helps them to sit smoothly against the body and makes for a cleaner finish on the inside. We cut the lining from an old white striped sheet. For this fabric the background of the Zebra print is white so lining it also prevents the chance of the lighter colour being transparent.

Zipper detail

The sharp lines of the dress make it a very modern and a current style. We wanted to continue this look through the finishings and chose to add an exposed chunky zipper down the center back.

The zipper length starts between the shoulders and runs down to the hips. For this we used a 60cm black open ended zipper that we stitched on the outer of the finished dress.

Pocket Appreciation

Yes to pockets. Always yes to pockets. In some case when there aren’t pockets we add pockets. We have a photo copy of a side seam pocket bag pattern piece we keep around to be able to add it if there isn’t one included but it wasn’t needed for this, the pattern came with it’s own pockets which of course we included.

Finished Zebra Stripes

The pairing of pattern and fabric worked out really well for this one.  It was a great addition to be able to add the feature of the zipper down the back.  The idea of doing this didn’t happen until Lauren was rumaging through the zipper box and found the zipper.  It was the perfect length and we did not have plan for it previously.  

A strong print the Zebra Stripes from Fabric Hoarders could have become over whelming to the eye if cut into by too many design lines but the Simplicity 8594 with its princess line front and A line skirt was a great pairing. 

Photography Notes

Photographer: Erin Ritchie
Model: Lauren Ritchie
Dress Fabric: Zebra Stripes from Fabric Hoarders
Dress Pattern: Simplicity 8594

Other projects we have made from fabrics from Fabric Hoarders include Liberty Orchard Garden Flora Dress, Begonia by Schultz in Micro Dots and Magnolia Dress from SOLA Patterns in Orchard Garden Pheasant Forest

Liberty Orchard Garden from Fabric Hoarders - Flora Dress - Two Sewing Sisters

Liberty Orchard Garden from Fabric Hoarders Flora Dress

Summer dresses are here!  Which means for us a great urge to sew pretty floral cotton dresses.  This project ticked all of those boxes.  Using a floral print Liberty Cotton from Fabric Hoarders we created a variation of the By Hand London Flora Dress.   

Liberty Orchard Garden from Fabric Hoarders

Located in a town on the Murray River in North Victoria, Fabric Hoarders is an independent fabrics store. They have a great selection of cotton and liberty fabrics in their online store. We have partnered with Fabric Hoarders and its business owner Leanne to share with you some of their wonderful fabrics.

This beautiful print is the blue colour way of the Orchard Garden design by Liberty. It is a cotton fabric with an off white background and blue floral repeated design.

There is a wide range of iconic Libery Fabrics on the Fabric Hoarders website and is purchased in 25cm increments.

Flora Dress in Liberty Cotton

The Flora Dress is a lovely pattern from By Hand London – it has a fitted bodice with waist and bust darts. There are two bodice varations, we chose to make the tank style with high neck and thin shoulder straps

Flora comes with two skirt options either a shaped circled or pleated option. We opted for a different style again and created a gathered skirt with darts.

Construction

Adding the shoulder ruffle

To create the ruffle cut a rectangle piece that is twice the length of the strap x 10cm wide (4cm wide ruffle + 1cm seam allowance, doubled)

Press the ruffle in half length ways

Finish the ends of the ruffle by putting right sides together and stitching across the ends

Turn right side out

Create gathering stitch close to the raw edge

Prepare the strap by pressing in half then the edges into the middle

Using the gathering stitch pull the ruffle up so the ends sit 1.5cm from the raw end of the strap (so they don’t get caught up in the bodice)

Tack the ruffle into place

Fold the strap in half, sandwiching the ruffle

Top stitch

The strap is finished and ready to be inserted into the bodice as shown in the instructions

Skirt

We created the skirt by starting with two rectangles, the width of the fabric and 65cm long. Using darts along with gathers creates a more bell shaped skirt and reduces the bulk around the waist. The darts should sit from the waist to the hip, this is approximately 25cm, for this skirt we did a series of smaller darts spread out across the skirt

Finished Liberty Flora

Pattern placement was key.  You will see us talk about pattern placement and pattern matching alot.  It is steps like making sure that if you have a dominate pattern that it is placed well on the body, lined up down the centre front  or on a skirt that the pattern lines up as is runs around the body.  

Making this floral dress in the Liberty print was no expection.  If you watch the video you will see how Erin folded the fabric when she was cutting it.  At first you might say it is not the most efficent way of cutting the piece but when you see the pattern lined up down the center front of the bodice you can then understand why this particular placement.  

Take pattern placement into consideration when select how much fabric you might need and if in doubt check with your fabric supplier how long the repeat is.  Fabric Hoarders have 25cm increments that works very well for a print like this as you can pick the repeat of this fabric with the butterflies being the dominant repeat running down the fabric.  

The Libert Ochard Garden cotton from Fabric Hoarders was lovely to work with.  It was perfect for a style like this, holding well in the bodice darts and enough softeness in the gathers of the skirt and added shoulder detail.  

Photography Notes

Photographer: Lauren Ritchie
Model: Erin Ritchie
Dress Fabric: Liberty Orchard Garden from Fabric Hoarders
Dress Pattern: Flora Dress from By Hand London

Altas Top by Stitch Witch Patterns - Tessuti Fabrics - Two Sewing Sisters with Lauren J Ritchie Millinery photo by Ben Christie Media (7) (1)

Floral Atlas Top + Tulle Skirt

Spring is in the air. For Myer Fashion on the Front Lawn, we wanted to create a dreamy, pastel spring outfit. What better way to achieve this than a  pale blue silk organza Atlas Top and tulle. Lots and lots of tulle. 

Fabric Details

Altas Top by Stitch Witch Patterns - Tessuti Fabrics - Two Sewing Sisters with Lauren J Ritchie Millinery photo by Ben Christie Media (7)
Atlas Top Pattern - Light blue silk - Two Sewing Sisters

Hiding in our fabric stash was a pale blue silk organza remnant purchased from Tessuti fabrics. Despite its beauty, the piece was only 1 metre limiting what we could make.

Enter the Altas Top by Stitch Witch patterns. When it was released, the pattern testing team consistently commented on how great the pattern was for using up larger scraps of fabric as it only required one metre of fabric.

Constructing the Skirt

Altas Top by Stitch Witch Patterns - Tessuti Fabrics - Two Sewing Sisters with Lauren J Ritchie Millinery photo by Ben Christie Media

Initially, for the skirt, we were going to cut strips of tulle and gather them onto the circle skirt. After adding the first two ruffles onto the skirt, our planned changed. Seeing the tiers on the skirt, we decided it was going to be too busy for the smoothness of the top (and take a VERY LONG TIME). Instead, we decided to layer multiple tulle circular skirts together.

The skirt is lined with white cotton broadcloth. Tulle layers start with tulle net and transition to soft bridal tulle on the top layers.

Constructing the Atlas Top

The Atlas Top is quick and easy to sew together. It only takes one metre of fabric, and has great design elements of the T-dart at the front and cross over straps at the back. We thought we share a few tips and tricks that we found useful when putting together the Atlas Top. 

T-dart

Construction photo - Altas Top by Stitch Witch Patterns - Tessuti Fabrics - Two Sewing Sisters

One of the reasons we loved this pattern was the T-dart feature. The risk of any centre front bust feature is the one that you (and most likely other people) will see it the most. In Step 2, it states “…mak[e] sure that darts are aligned”. 

We made a cotton check version the week before this one, pinned down the seam but just decided to sew from the neck to the waist all in one go. Needless to say, despite our pinning, the seam was not lined up, and the quick unpick came out.

For us making it in a silk and organza fabric this time, we were very conscious we wanted to avoid unpicking. This is because the fabric is delicate and would not survive being frequently unpicked!  

Our tip: Line up, pin and stitch the T dart starting and stopping only a few centimetres each side (see the photo, which shows you from the right side of the fabric). If it is lined up, then you are free to stitch the whole seam. If it isn’t quite perfect, you have a MUCH smaller seam to unpick. 


Back straps

As the silk organza is light and slightly translucent, we used the pale blue silk dupion behind the organza which acted as a lining. We also used the silk for the facing pieces.  As the facing and lining piece would be solid blue and not match the external print really wanted to make sure that the lining stay tucked underneath, and didn’t show when it was worn. 

In step 3 of the Atlas Top instructions, we interpreted to have a few additional steps. A key step of this is understitching. Where you are sewing in cotton fabric, these steps may be less needed as a strong iron would greater assist in making the straps still flat. However, we thought we would show you how we did it with additional fabric and silk. 

Construction photo - Altas Top by Stitch Witch Patterns - Tessuti Fabrics - Two Sewing Sisters
  1. Sew the short curved side of the strap first, with right side together. Cutting back the lining to reduce bulk. 
Construction photo - Altas Top by Stitch Witch Patterns - Tessuti Fabrics - Two Sewing Sisters

2. Under stitch the seam. Do this before stitching the long side of the strap, it is easier to access the seam (without it getting all tucked up) if you understitch one side first.

The benefit of understitching is that it keeps the lining in place, and not rolling out.

Construction photo - Altas Top by Stitch Witch Patterns - Tessuti Fabrics - Two Sewing Sisters

3. We found that once it was pressed flat, the lining piece was sticking out from the top fabric. Having the lining piece long or wider than the top fabric may also cause issues, as it could bubble out and not sit flat. To avoid these issues, we trimmed back the lining to match the top fabric.  

Construction photo - Altas Top by Stitch Witch Patterns - Tessuti Fabrics - Two Sewing Sisters

4. With right sides together, we then stitched the long side of the strap. Now looking at this photo, you may be thinking… “if you cut back the lining to match the top fabric, why have you not lined them up perfectly along the raw edge?” It is actually the same reason as to why we cut back the lining – the lining should be a little bit smaller than the top fabric. Only a little bit by 2-3mm, but it makes such a difference!


Construction photo - Altas Top by Stitch Witch Patterns - Tessuti Fabrics - Two Sewing Sisters

5. Final steps are to trim back the average of the lining along the seam of the long side of the strap. Then understitch the long side of the strap (from the right side of the fabric). It can be a bit tricky depending on the size of your sewing machine bed, as you are stitching down the ‘tube’ of the strap, but it is worth it for the result! Take it slowly, and make sure you have no additional fabric tuck into the seam.

Front facing

Construction photo - Altas Top by Stitch Witch Patterns - Tessuti Fabrics - Two Sewing Sisters

Step 5 of the instructions is all about the front facing! For the front facing we opted to use (the optional) woven fusible interfacing. To finish off the edges, instead of just overlocking we decided to finish it off with bias. 

We love using bias to finish off seams. Even though this facing has a lovely curved shape to the edge, the bias can sweep around the corners and sit perfectly flat against the curve. For this one, we even went a little bit special and made our own bias!

Finished Outift

Floaty, dreaming outfit with a BIG skirt. It is what spring outfit dreams are made of!

For Myer Fashion on your Front Lawn. Erin is wearing a Lauren J Ritchie Millinery headpiece.

Both pieces are great additions to our collection. The white tulle skirt is screaming at us with new outfit ideas – pair with other tops and jackets in lace, plain colours, pattern fabrics the possibilities are endless. 

Would you like to see our past Spring Carnival creations (from when we could be trackside)? Here are our last years Spring Carnival creations from Melbourne Cup and Derby Day.

Altas Top by Stitch Witch Patterns - Tessuti Fabrics - Two Sewing Sisters with Lauren J Ritchie Millinery photo by Ben Christie Media

Photography Notes

Photographer: Ben Chrisite Media
Modelled by: Erin Ritchie
Top Pattern: Stitch Witch Atlas Top
Top Fabric: Tessuti Fabrics
Hat: Lauren J Ritchie Millinery

Altas Top by Stitch Witch Patterns - Tessuti Fabrics - Two Sewing Sisters with Lauren J Ritchie Millinery photo by Ben Christie Media
Minerva Red Fabric - Two Sewing Sisters Butterick 6410 and Vogue 9075 with Lauren J Ritchie Hat

Minerva Maker + Cup Day Jumpsuit

We are excited to be welcomed as part of the Minerva Maker team!  Showcasing their beautiful fabrics, we are looking forward to showing you a variety of different makes.  You can shop Minerva Craft’s full range of fabrics here.

Our first Minerva make ticks so many of our sewing boxes:

  • Bright and fun pattern
  • Cotton sateen (one of our FAVOURITE fabrics to sew with)
  • re-wearable for events as well as work
  • and did we mention… it is a jumpsuit!

Minerva Fabric

Fabric photo - Minvera Red Fabric with black bias - Two Sewing Sisters Butterick 6410 and Vogue 9075

If you have followed us for a while, you will know that cotton sateen is one of our favourite fabrics to sew. The thicker cotton makes it easy to sew, with the slight stretch making it comfortable and easy to wear.

For this project we had a beautiful Red Floral Stretch Cotton Sateen Fabric (MV-J739-Red) from Minerva Crafts to work with.

Pattern

Vogue 9075 - Minvera Red Fabric - Two Sewing Sisters

We hacked together the bodice of Butterick 6410 and jumpsuit pants from Vogue 9075.

We had made the jumpsuit before and loved the style and fit of the pattern. However, we really wanted to add a collar onto the jumpsuit. While we could have tried to attach a collar to the existing neckline, we decided to swap out the bodice pattern altogether.

After a hunt through our pattern collection, we create a shortlist of bodice options. We were focused on finding a pattern that had design lines we could feature in the bodice which wouldn’t get ‘lost’ in the busy print. The great thing about pattern hacking it is like a food buffet, you can combine two half meals together or have a little bit of a lot of foods – the options are endless

Butterick 6410 - Minvera Red Fabric - Two Sewing Sisters

In the end, we decided on Butterick 6410. It had a collar and horizontal design feature across the bodice (see how we did this in the construction section!)

Construction

Construction of Minvera Red Fabric with black bias - Two Sewing Sisters Butterick 6410 and Vogue 9075
The bias was pre-pressed. We ironed out the “flaps” so the raw edges are together
Construction photo - Minvera Red Fabric with black bias - Two Sewing Sisters Butterick 6410 and Vogue 9075
To increase accuracy we stitching the bias on one of the bodice pieces, before sandwiching the bias between the two bodice pieces

To emphasise the design lines, we added in a black flat bias around the collar and horizontal bodice line. The Minerva fabric has such fabulous (but busy) print. We wanted to avoid losing the design lines in such a busy print. Unlike piping, where you would have a cord in the bias, we used the bias pressed in half flat. This created a modern look and provided a strong feature. 

Once the bodice was together we did testing fit to make sure it fit and the waist seam would match up the key points of centre front, side seams and back. It was a relatively small adjustment, adapting the patterns along the waistline to come together and worked well on the fabric.  

Finished Jumpsuit

Usually, during this time of year, we are preparing for the Melbourne Cup carnival, curating outfits and sewing hats and dresses. This year, like a lot of things, fashion on the field looks a bit different.

This year, we participated in Myer Fashion on your Front Lawn. Erin is wearing a Lauren J Ritchie Millinery headpiece.

One of the best things about this Minerva jumpsuit is that we can wear it to in so many contexts. Our focus is to make garments that were fun and we would get a lot of wear out of in the future.

Is it a little too bright for me to wear to the office? Maybe. Will we wear it anyway? Absolutely.

Would you like to see our past Spring Carnival creations (from when we could be trackside)? Here are our last years Spring Carnival creations from Melbourne Cup and Derby Day.

Minvera Red Fabric - Two Sewing Sisters Butterick 6410 and Vogue 9075 with Lauren J Ritchie Hat

Photography Notes

Photographer: Ben Christie Media
Model: Erin Ritchie
Pattern: Bodice of Butterick 6410 and pants from Vogue 9075.
Fabric: MV-J739-Red Stretch Cotton Sateen Fabric in Red from Minerva Crafts
Hat: Lauren J Ritchie Millinery

Minvera Red Fabric - Two Sewing Sisters Butterick 6410 and Vogue 9075 with Lauren J Ritchie Hat

Bird and Butterfly Cobalt Jacquard from Fabric Deluxe

We are excited to be working with Fabric Deluxe to showcase this beautiful fabric for this project. We really wanted to make something from the range of Fancies and Textured fabric from the Fabric Deluxe selection.  When we came across their Bird and Butterfly Cobalt Jacquard and knew that was it! 

Fabric Deluxe is a fabric store based in Melbourne and has an online store. They aim to stock lovely, wearable fabrics that fit into the real life of their customers. Their stock is a variety of different fabrics including linens, viscose and wools for everyday wear to more special occasion pieces, which they like to call fancies.  The approach of the Fabric Deluxe team is first that they are sewers too and understand the dedication of making a handmade garment. 

Fabric Details

Fabric Deluxe Bird and Butterfly Cobalt Jacquard v1579 - Two Sewing Sisters
Vogue Dress Pattern v1579

This fabric called for something special! The cobalt and blue tone pattern against the black background is such a strong design. The pattern within the design features a repeat of birds and butterflies amongst leaves and flower shapes.

To highlight the detail of the fabric, we needed to select a style that would best showcase this. It needed to respect the fabric and not cut through the pattern of the fabric. This means considering bust darts over princess lines, how a sleeve is drafted and if the skirt will fall straight or if a fuller skirt will showcase the pattern better.

We have previously made Vogue 1579 and loved how the cape falls over the shoulders. The cape is attached to the dress around the neckline of a sleeveless bodice. This was a great pattern to use for this jacquard fabric as the birds and butterflies could fly around the capeline, and it becomes a smooth showcase of the beautiful detail of the fabric.

Construction

We wanted to make sure we got the pattern placement and matching correct This means making sure there was a bird directly in the middle of the bodice and in the back of the cape. The bird appeared to be the most dominate feature of our eye. They repeats down the skirt with two mirror image birds sitting on the centre front.

The pattern design asks for the front and back to both be cut on the fold with an underarm zipper. As the skirt has a split in the centre back to allow for enough movement to walk it has a centre back seam. Check out our video to see how we shuffle the pieces around to achieve this cutting layout.

Constructing the bodice

Bodice construction of Vogue Dress Pattern v1579

The instructions list this as an “average” in terms of skill level required. If you can conceptualise how it comes together, it all makes sense. Even for an experienced sewer, it is worth stopping by the instructions for this one to make sure you have the openings in the correct spots and understand how the neckline finished under the cape.

The armholes are finished by leaving the shoulder seams open. This is a great method which used a lot for sleeve garments because it means you do not have to try to contort the garment to pull it through to stitch.

Hemming the Cape

Fabric Deluxe Bird and Butterfly Cobalt Jacquard v1579 - Two Sewing Sisters

As the cape was the hero of this design, it deserved to be beautifully finished. The jacquard fabric could easily “bruise” with a top stitch line, we chose to hand stitch the hem. On the underside of the fabric is contrasting, and because of the shape of the cape could be seen from some angles. To keep a smooth edge and prevent any stray threads from the jacquard weave showing we used a bias tape. This sits on the inside of the hem and using a pick stitch to catch the outer layer.

Hand stitching bias hem
Hand stitched hem cape of Vogue Dress Pattern v1579

Center Back Split

Fabric Deluxe Bird and Butterfly Cobalt Jacquard - Two Sewing Sisters

The original pattern finished above the knee, however we chose to length this. We wanted this dress to have a longer line to show off the fabric. The pattern is a straight skirt, so this is an easy pattern hack to do. Keep the right angles of the side seams measure and mark an even amount down from the hem.

Inside split of Vogue Dress Pattern v1579

The Fabric Deluxe Team recommend lining this fabric as the underside is very textured and may feel rough against the skin. We defiantly agree with this recommendation, it is lovely quality fabric, but this is a natural trait for this type of weave. You want your garment to be comfortable and easy to wear, and a lining will help with this.

As this was a fitted dress, we would have lined the skirt anyway to help it set well while worn and move easily when walking, not cling to the body. This is how we finished off the inside of the split.

Finished Dress

The Bird and Butterfly Cobalt Jacquard from Fabric Deluxe was beautiful to work with.  It has a natural body and structure to it.   This was a great combination of fabric and dress pattern.  We how the cape sat out around the body and just as we had planned the bird was placed on the centre focal points.   

Fabric Deluxe Bird and Butterfly Cobalt Jacquard v1579 - Two Sewing Sisters

Photography Notes

Photographer: Ben Chrisite Media
Modelled by: Lauren Ritchie
Dress Pattern: Vogue 1579
Dress Fabric: Bird and Butterfly Cobalt Jacquard from Fabric Deluxe

This garment was formed through a partnership project between Fabric Deluxe and Two Sewing Sisters.

Fabric Deluxe Bird and Butterfly Cobalt Jacquard - Two Sewing Sisters

This dress was featured in the Lauren J Ritchie Millinery Taminick Spring Collection photoshoot. See those images on Lauren’s website here.

Ottilia Top - Schultz Apparel - Two Sewing Sisters

Ottilia Top from Schultz Apparel

We watched Schultz Apparel tease us with fun tops.  Sharing them to her socials, they were adorable!  We know we declared our top phase had come to a close and it was going to be dresses for a while. But then the Ottilia Top appeared.  It has all the great features of a Schultz Apparel Pattern; amazing sleeves and clever construction.  Usually we are apprehensive about wrap tops due to cup size and it not sitting well around the bust but we were excited to give this pattern a try.

Ottilia Top Details

Ottilia Top is a short wrap top with short vintage inspired puffy sleeves and an extra-long belt that can be tied multiple times around the waist.

This pattern is suited for light to middleweight woven fabric such as a cotton, linen, viscose, tencel or polyester.

We made it in a green and white striped cotton fabric we found in our stash. We don’t remember where it came from but based on the colours it is likely something Nanny picked and we are lucky enough to be able to stitch it up.

Constructing the Ottilia Top

The instructions are easy to follow to construct this folky style dress. The tiered skirt is constructed by joining together gathered rectangles. Instead of needing to print pieces for the rectangular pieces, Schultz Apparel gives the measurements for the rectangles. saving on printing and cutting time (not to mention the environment through the saved pieces of paper!).

The sleeve is constructed with two layers, the other fuller body and stabilising under layer. Initially we cut both out of the striped fabric but because of how strong the stripe as you could faintly the stripe in the under fabric. We recut the lining in a white cotton so

How to line something that has a facing

You might have heard us say before what a fan we are of lining garments. There are a few reasons for this. It gives it a better finish, less exposed seams inside of the garment. It also means that the pressure is not on the outside fabric to side flush again the body and appear flat. The lining provides some extra structure.

Not all garments are lined, some just have facings. This is still a great way to finish a garment, it provides clean edges and they are shaped pieces that follow the contours of the outer shape, they mimic the outer layer. It might feel rebellious to divert from the instructions, it does take confidence to know where you are heading with the garment but it can definitely be done. Here is a bit of guide as to how we go about it.

Cut all of the pattern piece as the instructions say, all the bodice pieces and facing.

Cut the bodice pieces in your lining fabric – the same as the outside

Stitch the pieces together to create the outer shell, lining and facing.

Finish the edge of the facing. We over lock ours in a matching thread.

Garment Construction for Ottilia Top from Schultz Apparel by Two Sewing Sisters

Attach the facing on top of the lining.

You are looking to create to make two shells; the outside and the lining.

The lining should be right side up with the facing also sitting right side up. Think of them as becoming one.

Garment Construction for Ottilia Top from Schultz Apparel by Two Sewing Sisters

Bag out the lining and the outer shell.

Put the right sides together and stitch around the neck line. Cut back the seam allowance and under stitch.

As this is a top around the hemline.

Leave the armholes open.

Garment Construction for Ottilia Top from Schultz Apparel by Two Sewing Sisters

Pull the bodice right side out through the open arm holes.

It will now look like this.

Garment Construction for Ottilia Top from Schultz Apparel by Two Sewing Sisters

You are back to following the instruction booklet

Finish the sleeves.

The Ottilia has a lined sleeve to help hold the puff shape.

Garment Construction for Ottilia Top from Schultz Apparel by Two Sewing Sisters

Tack the head together using the gathering stitch

Pin the sleeve into place and stitching

Finish around the armhole. We over locked the seam allowance.

This will finish off the garment. Enjoy wearing it!

This is what it looks like inside out.

Finished Ottilia Top

The Ottilia Top absolutely lived up to the dream! Can we say again how good Schultz Apparel sleeves are? 

The top is easy to put on, again no fastenings.  The wrap fits through a key hole provided in the instructions.  The fit is great, our worry about wrap tops and dresses was not needed here.  We made an elastic waisted skirt with ruffle to wear with it.  

For us the next time we make it we will lengthen it around 3cm so it reaches the waist.  It gives us the option to be able to wear it work.  Don’t get us wrong, we love the striped version!  But it is more casual than what we could wear to the office.  

If you have been feeling inspired by the Minna or Begonia how about a hybrid? It is definitely going on our make list.  Check out Schultz Apparel mash up on her Instagram.  

Photography Notes

Photographer: Erin Ritchie
Model: Lauren Ritchie
Pattern: Ottilia Top by Schultz Apparel
Fabric: Nanny’s Fabric Stash

Who knows what we were laughing about but it was great.

Magnolia Dress from SOLA Patterns

We really enjoy pattern testing, can you tell? It is exciting to see what pattern companies are exploring in their processes. We think it is a great way to sew a range of different designs and support small businesses.  We are part of the a few groups on Facebook where there are call outs for pattern testers. These are usually from smaller start up companies but is a great way to see what is being developed. 

A few weeks ago, in the Sewing Pattern Testing Group, we saw a post from Danielle Tchao asking for interest for Testers for a new pattern company she was with co-founder Vicky Quan called SOLA Patterns.  The trade drawings of their designs looked really good, which is something we look for. We feel it means the designer has a good technical understanding and that will be reflected in their pattern drafting and design. 

SOLA Patterns was launching a few different designs but we put our hand up to test two of their dress patterns.  The first was the Magnolia Dress and the Laurel Dress which we will share shortly.  

Magnolia Dress Details

Magnolia Dress from SOLA Patterns

The Magnolia design is a shift style dress with two striking sleeve options. There is the voluminous upper sleeve that tapers to highlight a narrow forearm or a pleated petal sleeve. The bodice has a front bust and diamond dart and it is finished at the back with a center back zipper.

Magnolia Dress by Solace Patterns made in Liberty Fabric from Fabric Hoarders by Two Sewing Sisters

This pattern is designed for woven fabrics with a consideration of how you would like your sleeve to sit. Using thicker fabric for the full length sleeves will create quite a lot of volume which could be a fun effect.

We made both versions to explore the pattern style. This is our petal sleeve version in a mid weight woven cotton.

Liberty Orchard Garden Pheasant Forest from Fabric Hoarders

For this project we teamed up with Fabric Hoarders who supplied us with a delightful Cotton Liberty Print. Fabric Hoarders stock a wide variety of the iconic Liberty Fabrics on their website, check out their range here. Liberty Fabric is such a distinctive style and it was great to get to work with such a beautiful fabric.

This is the Orchard Garden Pheasant Forest in the blue colourway. It is 112cm wide and 100% cotton.

We fully lined the dress with a white lining fabric. As the petal sleeves is shaped we finished the raw edge off using a bias tape on the side of the hem.

The fabric we made the Bergonia Dress was also from Fabric Hoarders, you can see our post about that here.

Constructing the Magnolia Dress

Our preference is to have a more fitted style bodice so we would recommend checking out the ease allowed for in this pattern. SOLA Patterns list this on their website so check your measurements again the amount of ease and how fitted you would like the finished dress to be.

We like to line all of our dresses. It helps the outer fabric to sit smoothly and allows for ease of movement so it can slip across the body. The pattern uses and neck facing, it is still an important pattern piece as it means that a little bit of the outer fabric can be used along the neck edge. This is important because event if under stitched it helps to make sure the lining doesn’t show through to the outside.

Inside dress finished for Magnolia Dress by Solace Patterns made in Liberty Fabric from Fabric Hoarders by Two Sewing Sisters

Finished Magnolia Dress

The Magnolia dress is a great style, we loved the sleeve options so much that we made both.  It sits so well in the cotton fabrics and it could also be made in other wovens.   

Photography Notes

Dress Pattern: Magnolia Dress from SOLA Patterns
Dress Fabric: Orchard Garden- Pheasant Forest in blue from Fabric Hoarders
Photographer: Erin Ritchie
Model: Lauren Ritchie